2018 Advent Calendar Tutorial

As always this year's advent calendar tutorial is simple and natural. It is a bit different from the norm though, as I have decided not to include physical gifts inside. Mainly because every year I make an advent calendar for my girls and every year, someone buys them a chocolate one so I figure, they don't really need two!
Instead, each pocket contains a promise that they can trade in whenever they like, I'm not sure how it will go down, but I like the idea, so we will have to see. It also means that it is pretty cost effective too!
It is more or less self-explanatory, but I have written down instructions just in case.

You will need:
small envelopes, or if you prefer you could make some paper pockets
paper for inside to write your promise on or a gift
Washi or tape of some sort
Scissors
Decoration, I tend to collect flowers that have dried over the year, but you could use bits from the garden, or fir, or even light Christmas decorations
Fabric, pins, a stick and string, OR cardboard and glue

Cut the paper in to pieces that are small enough to fit in the envelopes.


2. Write your 'promises' on the paper, so for example, I wrote things like; an extra bed time story, a trip to the park, watch a film, a pudding, a snuggle on the sofa, help with homework, stay up ten minutes later. Choose whatever you think the person would like.


3. Put the promises in the envelopes and seal.


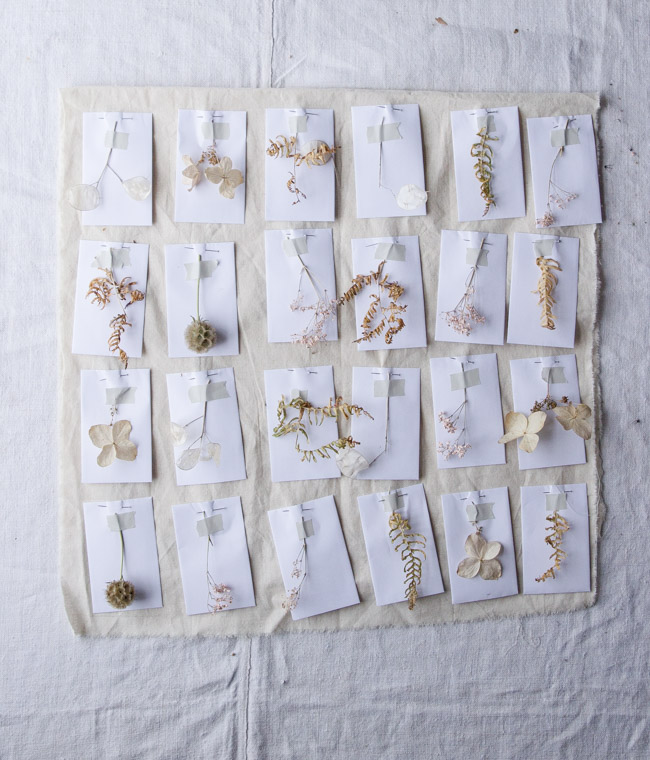
4. Start decorating! I randomly cut pieces of the dried flowers and foliage I had collected and stuck them to the envelopes with washi tape. If you want your advent calendar to be more balanced, count out each foliage or decoration type for an equal amount.


5. To finish, you can either stick the envelopes to a piece of cardboard, or do as I did, and pin them to some fabric which can be hung on the wall. I laid the envelopes out first before pinning, just to check I was happy with the overall look. Again I kept it random.
6. Once you are happy, pin the envelopes and hang the fabric on a straight stick or some dowling.

If you don't fancy this advent calendar, below are some previous tutorials you might like instead..
And of course, if you do make one, I would love to see it.
Emma x