Wired Buttonhole Tutorial

wired-button-hole-tutorial-18
I feel incredibly lucky, to have made quite a few friends from writing this blog, one of them being the lovely Caroline from Wild Rubus, I do look forward to her coming over each month for our flower tutorial. We have gone down the traditional route this time, perfect for the wedding season, by showing you how to make a wired buttonhole.
Per button hole you will need:
1 x rose
2 x ivy leaves
1 x sprig of rosemary
2 x sprigs of lavender
1 x rose bud
Thin florists wire
Thick florists wire
Florists tape
1 x pin

wired-button-hole-tutorial-1
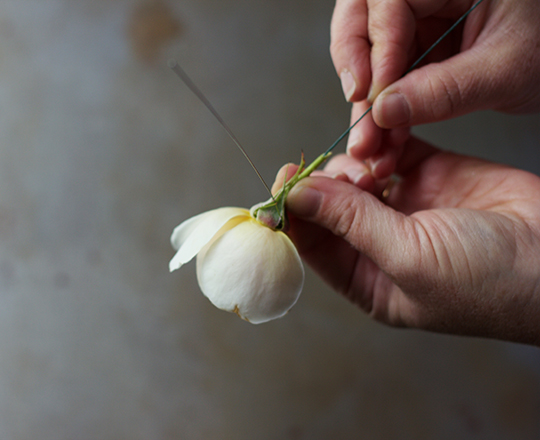
1. Start by wiring the rose, place a thin wire through the base of the rose.

wired-button-hole-tutorial-2
2. Push the wire right through, so it comes out the other side.

wired-button-hole-tutorial-4
3. Trim the rose stem down, so it is about 3 cm long, then push the thicker piece of wire up through the stem.
wired-button-hole-tutorial-20
4. Fold the thinner wire in half.

wired-button-tutorial-6
5. Wrap one end of the thin wire, around the other end of the wire and the rose stem.

wired-button-hole-tutorial-8
6. Starting near the base of the rose, tape around the stem and wires, holding the wires in place.

wired-button-hole-tutorial-9
7. Trim off any remaining thin wire, and also trim down the thicker wire to about 10 cms.

wired-button-hole-tutorial-10
8. Next wire the ivy leaves, in order to be able to get one to fold down at the front of the button hole, you need to place the wire quite high up the leaf. Pierce a thin wire through either side of the vein, about half way up.

wired-button-hole-tutorial-11
9. Fold the wire legs down, and wrap one end around the ivy stem and other end of the wire, as per the rose instructions above.

wired-button-hole-tutorial-12
10. Tape the wire in place as per the rose.
11. Wire the lavender, rosemary and rose bud, you do not need to pierce these, just fold a thin piece of wire in half, and wrap one end around the stem and other end of the wire, tape into place.

wired-button-hole-tutorial-14
12. Group the ivy leaves around the rose, bending the front ivy leaf down carefully so you can see the rose clearly.

wired-button-hole-tutorial-15
13. Add in the rosemary, lavender and rosebud, as you would any small posy.

wired-button-hole-tutorial-16
14. Squeeze the wires together in your hand, the tape makes them sticky so they hold together, and then wrap a final piece of tape, starting at the base of the flowers and spiralling down the stems. Before you get to the bottom, snip the stems to the same length and cut at an angle. Tape around the bottom of them, and then spiral back up slightly with the tape. This prevents clothes getting damaged by the ends of the flowers.

wired-button-hole-tutorial-17
Hints & Tips:
This type of button hole needs to be made the morning of the event.
By wiring the flowers, you can manipulate them into shape, and they should also survive quite well.
Be careful if you use soft stemmed flowers, wiring them is quite tricky as they are so fragile.
As you tape around the stems, try to pull the tape at the same time to stretch it.
Tape as tightly as you can for minimum bulk.
Don't forget to pop over to Caroline's blog, to see what she has to say about today's tutorial. And if traditional isn't your cup of tea, don't worry, next month we will be demonstrating how to make a slightly wilder looking posy buttonhole instead.
I'm now off on holiday, so I definitely won't be posting for the next week. But hope you have a good one, whatever you are up to.
Emma x